Special Feature: Products Sally Recommends
Deconstructing the Baguette
The baguette is at once the simplest of breads and the most difficult to perfect. It is the most demanding test of a bread baker’s skill.
In recent years the secrets of professional bakers have been drifting out to the general population of amateur bakers. Techniques can be gleaned from a variety of sources. Bread baking cookbooks today do more that provide recipes; they explore and explain the process. Bread baking courses for amateurs are becoming more popular at professional cooking schools and even being offered by some bakeries. Articles appear in magazine and newspapers with a different take on some aspect of the process.
This article will attempt to distill this wealth of information to present the techniques required to produce a professional looking and tasting baguette. Four elements are considered: flavor, crumb, crust and appearance.
Flavor
Flavor develops with time. There are several ways to achieve this but long fermentation is necessary to develop the complex flavor of the well made baguette. Two techniques are commonly used to develop flavor; use of a pre-ferment and use of a long (overnight) primary fermentation.
A pre-ferment is a starter that has been developing over time. A simple starter like a Poolish is made by mixing equal weights of flour and water with a pinch of yeast and allowing it to stand at room temperature, covered, at least 24 hours. More complex starter recipes abound that use different kinds of flour, different fermentation times, wild yeast versus packaged yeast, etc. You can also keep a starter going by reserving a little of the unbaked dough from each batch.
The second method used to develop flavor is the long (overnight) primary fermentation or first rising. Most recipes will tell you that the first rising is complete after the dough has about doubled in size. This is reasonable advice for the overnight fermentation as well. To slow down the rising process a slightly cooler dough and smaller quantity of yeast in the dough are necessary. This can also be accomplished by storing the dough for some part of the primary fermentation in the refrigerator.
These two techniques can be combined; a preferment with a long primary fermentation.
Crumb
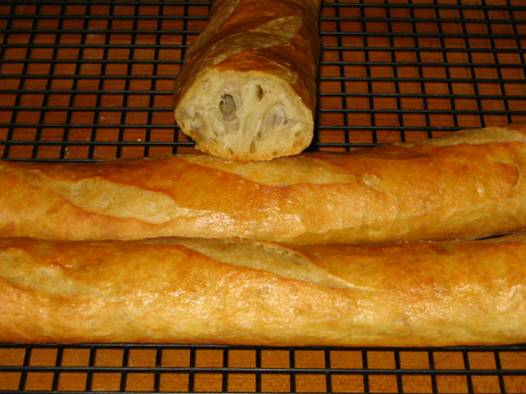
The crumb refers to the distribution of holes in the finished bread. The random distribution of holes of various shapes and sizes is desirable in a baguette. This is achieved with high hydration level in the dough and short kneading time. These two factor work together. Kneading is generally required to develop the gluten in the bread. Gluten will also develop over time with shorter kneading time if the dough has sufficient water to allow movement of the gluten strands.
Hydration level of 68% - 75% is recommended. The convention for the ratio of ingredients in bread baking is to relate all ingredient weights to the weight of flour used. Flour weight is always given as 100 %. Water at 70% means that for every 100 grams of flour used in the recipe 70 grams of water is used.
Remember that for a final hydration level of 70% the hydration level of the starter must be included. If a Poolish with 100% water (equal weights water and flour) is used, the dough mix weights must be calculated to achieve a final water of 70%.
Dough with high hydration level can be very sticky and more difficult to work with. Resist the temptation to add flour or work the dough longer.
Professional bakers also make use of a technique called autolyze. The bread dough is mixed, with or without yeast, and without salt just barely long enough to form a wet, sticky dough. Allow the dough to stand in the mixing bowl or kneading surface for from 10 to 30 minutes before adding the salt (and yeast if it has been left out).
Kneading time of 1 - 2 minutes is sufficient if the dough is sufficiently hydrated. It is intuitive that a random distribution of holes and hole sizes in the final bread comes from short kneading time. The more you knead the dough, the more homogeneous the dough will be. This may be desirable in sandwich bread, but not what we want here.
When shaping the final loaves for proofing before baking, do not work the bread more then necessary in order to preserve the air pockets developed during the long slow fermentation.
Crust
The crispy, chewy crust characteristic of the best baguettes is a result of the way the bread is baked. The basic design of the professional baking oven includes the following features.
Stone Deck with Low Profile Chamber
Hearth style breads are baked directly on the stone deck. No bread pans are used. Special tools are used to load multiple loaves to the deck. The home baker can approximate baking on the deck by baking on a pre-heated baking stone. Loading loaves to the baking stone is most easily accomplished by forming the loaves on parchment paper and then ferrying them to the oven with a pizza peal or on the bottom of a baking sheet.
The professional baking oven consists of a series of decks stacked on top of each other, each accessible via its’ own door. It is in essence a series of low profile ovens stacked one upon the other. The clearance height in the oven is sufficient to load and bake bread, no more.
Steam Injection with Controlled Venting
Bakery ovens have a built in steam generator that allows the baker to inject superheated steam into the oven at the start of baking. This slows down the caramelization of the sugars on the crust and provides for a good final spring in the oven before the crust sets.
The low overhead clearance discussed above also serves to concentrate the steam injected at the start of baking by minimizing the internal volume of the oven chamber.
Part way through the baking process, the baker vents the steam so the bread is finished in a hot dry oven. This combination of steam injection and controlled venting provides the light airy loaves with a crispy, chewy crust we expect from the professionally baked baguette.
Attempts to mimic this steam generation with controlled venting have been developed by frustrated home bakers. These techniques range from misting the sides of the oven to pouring hot water into a pan on the lowest shelf in the oven (under the baking stone). These techniques don’t really come close to approximating the steam generated in a professional bread baking oven.
There is a product available from The Steam Maker Bread Baker Company (www.steambreadmaker.com) that closely approximates the conditions in a professional baking oven. It combines handheld electric steam generator with a baking chamber that fits into the typical home oven. The baking chamber is a baking stone and lid that contains the steam during the initial part of the baking process. In the interest of full disclosure, this article is written by the President of the Steam Maker Bread Baker Company.
Appearance
The appearance of the loaves is a result of the formation process, scoring the loaves immediately prior to baking and the actual baking (discussed above). Formation of the loaves requires attention to two somewhat competing goals. First, we want a tight or stretched outer crown to the loaf during final proofing. Second, we want to minimize handling so as to not degas the loaf after the primary fermentation.
The following is one technique that can be employed to shape the loaves into the final desired shape of a 14 inch long, uniform baguette.
Start with 9 – 10 ounces of unbaked dough. Gently flatten the dough into a square approximately 4 x 4 inches. Fold the bottom and top thirds on to the center. After folding each third press the seam together with your fingertips. This begins the process of forming a tight outer surface. Let the dough rest ten minutes at this point.
The dough should look a little like a long roll. The goal now is to elongate that roll to the baguette shape (about 14 - 15 inches long for 9-10 ounces of dough). Form an indent in the loaf along its’ entire length, then fold the dough over lengthwise pressing the ends together to form a seam that runs the length of the loaf. Roll the dough back and forth on the work surface with to form the desired torpedo shape. Repeat the process a second time; fold the dough lengthwise and press the seam together before rolling on the table under both hands. After the second time this process is completed, the loaf should be approaching 14 inches. Finalize the process by rolling to the final desired length.
Note the location of stretched surface of the loaf and the pressed together seam. When the loaves are fully formed and placed on what ever surface being used for the final proofing, the final seam created should be down on the surface and the stretched outer surface will face up.
Keeping in mind the desire to minimize handling of the dough, the process of folding the dough and pressing the ends together should only be done twice. The loaf should be uniform thickness along its entire length so it bakes evenly.
Professional bakers use controlled temperature and humidity environments for final proofing. Misting the loaves and covering loosely with plastic wrap will prevent them from drying out during proofing in an uncontrolled environment. The process of misting and loosely reapplying the plastic wrap may be repeated once or twice during the final proofing, depending on the humidity level in the kitchen and the length of time required to reach the size desired for baking.
The extended primary fermentation time described above will necessitate an extension of typical final proofing time. The loaves should grow by at least half, if not double in size. This can take 1 1/2 to 4 hours. Remember, if you are using the Stream Maker Bread Baker, you will get a good final spring (expansion) in the oven.
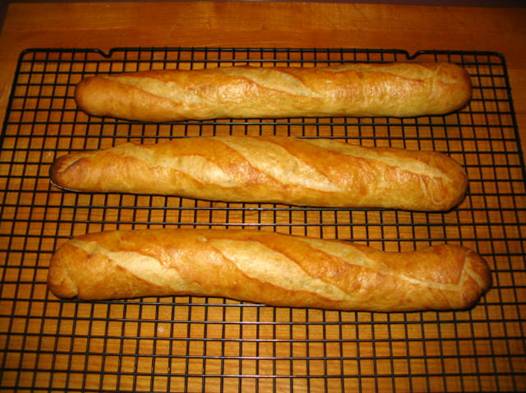
Preheat the baking stone in the oven for an hour at 425 - 450 degrees before loading the loaves. Immediately prior to loading the loaves to the oven, score the loaves along the top surface with a razor blade or other very sharp blade. A typical pattern is three diagonal scores that each cover approximately one third of the length of the bread.
Bake the bread until it is a deep golden brown. Do not remove the loaves early. If the Steam Maker Bread Baker is used, follow instruction related to steaming time and the time to remove the lid from the oven in order to finish baking in a hot dry oven.
The Result
Professional bakers spend a long time learning and perfecting their craft. The baguette is among the most difficult of breads to perfect. Do not expect professional results with the first attempt at making baguettes. Like anything else worthwhile the quality of the results achieved at home is determined by the level of effort and amount of time dedicated. The advantage we enjoy today is the wealth of professional level knowledge at our fingertips.
The recipe below will provide a starting point for baking professional baguettes at home.
Starter – Poolish
All purpose flour – 100 grams
Water – 100 grams
Yeast – pinch (0.5 grams)
Mix and let stand at room temperature at least overnight.
Bread dough
Poolish
All purpose flour – 375 grams
Water – 225 grams
Yeast 1 grams
Salt 10 grams
Final Dough Percentages
Flour – 475 grams – 100%
Water – 325 grams – 68.4%
Yeast – 1.5 – 0.3 %
Salt – 10 grams – 2.1 %
Mix poolish, flour and water until just mixed. There is some disagreement about whether yeast should be added before or after the autolyze. You decide. Let stand for 10-30 minutes. Add salt (and yeast if not added before autolyze) and knead for about 1-2 minutes. Final dough temperature should be 70 degree maximum.
Lightly oil bowl and turn dough to coat with oil. Cover bowl and mist interior of bowl to create humid environment. Let stand 12 - 24 hours. You want dough to about double in size. If dough is expanding too rapidly, process can be slowed by placing in refrigerator for a few hours. You do not want the dough to reach the stage where it collapses due to over-rising.
Remove dough from bowl and divide into three equal parts, each 270 grams (9.5 ounces). Form dough for final baking, proof and bake as described above.
![]()
Mark Schimpf is the President of the Steam Maker Bread Baker Company.
Note: This information was accurate when it was published. Please be sure to confirm all rates and details directly with the businesses in question before making your plans.


