Special Feature: Products Sally Recommends
The White (Chocolate) Edition
 It’s controversial. It’s lauded by some and banned from the kitchens of others. Its origins are shrouded in mystery. Among a notoriously temperamental family, it may be the most difficult member to conquer and bend to one’s will. It’s white chocolate, and this month we’re going to examine its possibilities and problems.
First off, let’s talk about what white chocolate is and what it isn’t. White chocolate, as most of you know, isn’t real chocolate at all. Why not? Real chocolate must contain cocoa solids (the dry solids that give it both brown color and a good deal of flavor). White chocolate contains cocoa butter, milk powder, sugar, and, often, flavorings (vanilla is a popular one). The FDA finally authorized a standard of identity for white chocolate, effective 1 January, 2004; real white chocolate must contain at least 20% cocoa butter, 14% milk solids, and 3.5% milk fat. It cannot contain more than 55% sugar or other “nutritive carbohydrate sweeteners”. Confusingly, there is real white chocolate as well as the lookalike “confectionery coating”. The latter is not worth your time, money, or calorie expenditure. Real white chocolate contains no vegetable fat other than cocoa butter. It is a creamy, off-white color with a yellowish cast to it. Confectionery coating, often seen in wafers, is pure white. It’s sickeningly sweet and usually contains other vegetable fats besides cocoa butter, resulting in unpleasant taste and mouth feel.
Some years ago, a reader e-mailed me to ask about the origins of white chocolate. Who had invented it, and when, and where? After a number of weeks of attempting to research this question, with very little success, I ended up writing Nestle in Switzerland. I received in reply a one-page letter in German, which I had to have translated, and even then the information provided was vague. All I was able to discover was that white chocolate had been invented in Switzerland, probably sometime in the 1930’s, as a way of using excess cocoa butter.
 Most of us have learned by hard experience that chocolate is quite heat-sensitive. White chocolate is especially so, and great care must be taken during the melting process to avoid scorching it. Chocolate can pick up odors from other foods, but it seems to me that white chocolate is particularly sensitive to this. White chocolate cannot be stored as long as milk or dark chocolate, even under ideal conditions. Even the best-quality white chocolate will sometimes refuse to smooth out as it melts (if this happens, don’t keep heating the white chocolate. Scrape it into a food processor fitted with a steel blade; process in “bursts” of ten seconds each, just until the white chocolate is smooth). And there are many who decry the sweetness and blandness of white chocolate. Even Sandra Boynton, author of the humorous Chocolate, the Consuming Passion, depicted white chocolate fanciers as turkeys (literally!).
Gentle reader, before you shun white chocolate entirely, I pray you, pause to reflect for a minute. True it is that, when I sit down to nibble on chocolate, it’s going to be of the good milk or dark variety. But white chocolate has a number of legitimate uses. It compliments citrus flavors beautifully, allowing one to enjoy a white chocolate-lemon ice cream or a Key lime-white chocolate mousse (neither milk nor dark chocolates pair as well with these types of citrus, in my opinion). White chocolate provides great color contrast to milk or dark chocolates, rendering it particularly useful as a decoration. White chocolate sets off colors beautifully, in a way none of it’s brown brethren can match (Christopher Norman Chocolates offers some stunning white chocolate Christmas ornaments, and Lillie Belle Farms sells entirely-edible “paintings” based on white chocolate “canvases”). And, at least for me, Life needn’t be all Bittersweet. There are times when I just want something less intense, and white chocolate can give me a gentler flavor with a little sweetness or provide a quiet background for a complementary taste. Rasmus Bojesen, working out of Copenhagen, used to make remarkable saffron-white chocolate filled pralines; perhaps he still does. White chocolate is used to wonderful effect in the Cognac or Grand Marnier truffles sold by Martine’s Chocolates; in the Helena (a white chocolate-coconut truffle) and Stacy (a dark chocolate filled with a cardamom-flavored white chocolate ganache) by Knipschildt Chocolatier; in the “Casimira’s Favorites” produced by XOX Truffles. Many of the major couverture houses manufacture fine-quality white chocolate, which they sell to avid food professionals and home bakers alike.
O, ye elitists of unswerving bittersweet servitude, before you trample white chocolate under the foot of derision, think for a moment about it’s possibilities. Yes, they are more limited than those of dark or even milk chocolate, but white chocolate can aid in creating some truly wonderful desserts. And that is sufficient merit for it to earn a small place in my pantry.
Chocolate Recipe:
Cheesecake Bars
I’ve never known just why people are so crazy about cheesecake, but I do know that these bars are wonderful crowd-pleasers, whether your crowd consists of kids or adults (teenagers don't eat these; they inhale them!). Bars are less glamorous and fancy than a whole cheesecake, but they are much quicker to prepare. In this case, there is an easy chocolate crust, a creamy and almost custardy white chocolate-cream cheese filling, and a chocolate glaze with a simple decoration.
I like to make these the night before I serve them. They will keep for several days in the fridge if stored airtight, but the crust does not retain its original crispness if they're made more than about twenty-four hours before serving. As is the case with many cheesecakes, these freeze perfectly, but again the crust will not be crisp when they are thawed. For a change of pace, see the variation at the end of the recipe.
Crust:
1-2/3 cups chocolate wafer crumbs (I use Nabisco Famous brand chocolate wafers)
2 Tbsp. granulated sugar
6 Tbsp. unsalted butter, melted
Filling:
6 ounces good-quality white chocolate, finely chopped
2/3 cup heavy cream
19 ounces cream cheese, softened
1/3 cup granulated sugar
1 tsp. vanilla
2 eggs, graded "large"
1 tsp. freshly-squeezed, strained lemon juice
Glaze:
4-1/2 ounces good-quality semisweet chocolate, finely chopped
Few grains salt
1/2 cup heavy cream
Decoration:
1 ounce good-quality white chocolate, finely chopped
1 Tbsp. heavy cream
Line a 13 by 9 by 2 inch pan with heavy-duty aluminum foil, shiny side up. Fold any overhang back against the outsides of the pan. Adjust oven rack to center position; preheat oven to 350 degrees F.
For Crust: In medium bowl, combine chocolate wafer crumbs and sugar. With spoon, mix to blend well. Add melted butter; blend thoroughly. Press evenly onto bottom of prepared pan. Bake in preheated oven for 7 to 8 minutes, just until crust is set. Remove to cooling rack, but leave oven on.
For Filling: Place white chocolate (which must be finely chopped) into small heatproof bowl. In small, heavy-bottomed saucepan, heat cream over low heat until very hot, stirring occasionally. Remove from heat; add about one-fourth of hot cream to chocolate. Let stand for a minute or two, then stir or whisk very gently until smooth. Gradually stir remaining cream into chocolate. Set aside. Cool until just tepid.
In large bowl, combine softened cream cheese, sugar, and vanilla. With sturdy, hand-held electric mixer, beat at medium speed just until perfectly smooth, scraping bowl bottom and sides frequently (this can also be done in the small bowl of an electric stand mixer). Add eggs, one at a time, beating at a low speed after each until smooth and scraping bowl bottom and sides (and beaters) often. At low speed, add melted white chocolate mixture, beating only until blended in. Stir in lemon juice.
Pour the filling slowly over a spatula onto the crust, which may still be hot. If necessary, spread filling to level it. Place into oven.
Bake for 15 to 18 minutes. This is done when the edges are slightly risen and set; if you gently tap the sides of the pan, the center of the cheesecake layer may still quiver slightly. The corners and sides may be starting to brown. Do not over bake. Remove to cooling rack. Allow to cool about 20 minutes at room temperature, then place in refrigerator (support the pan on trivets or pot holders on the refrigerator rack, as the bottom may still be hot). During cooling, the cheesecake layer may appear to fall slightly, except for the very edges--OK. Note: the bars must not become too cold before you glaze them. I start to make the Glaze and Decoration as soon as the bars go into the refrigerator; if the bars are chilled for more than about 30 minutes, they can become cold enough to give you trouble with the Decoration.
For Glaze: In small, heatproof bowl, combine finely chopped chocolate and salt. In small, heavy-bottomed saucepan, heat cream over low heat until very hot, stirring occasionally. Remove from heat; pour about half of hot cream over chocolate. Allow to stand for a minute or two, then stir or whisk gently until smooth. Gradually stir in remaining cream. Stirring occasionally, cool to room temperature before using (the best way to test this is on the inside of your wrist).
While Glaze cools, make Decoration (it's used immediately after the Glaze is applied): Place finely chopped chocolate in small cup. In very small container, heat cream over low heat until very hot, stirring occasionally. Pour hot cream over chocolate, then stir or whisk gently until smooth. Cool before using, stirring occasionally.
When bars have chilled until they are no longer warm, remove from refrigerator. To glaze, pour the room temperature glaze slowly over the top of the bars; spread evenly to within about 1/4 inch of all edges. Immediately apply decoration: with a teaspoon (not a measuring teaspoon), form thin parallel lines of the melted white chocolate mixture all across the glazed top surface (I make my lines parallel to the long sides of the pan). Don't make the lines too thick, or you may run out of the white chocolate mixture. Immediately, using a toothpick, draw it back-and-forth in very thin lines at a 90 degree angle to the melted white chocolate lines. Don't score the top of the cheesecake layer too deeply with the toothpick. Chill bars until cold, at least 3 hours. If chilling overnight before cutting, cover tightly when cold; be sure to fasten a piece of paper towel to the inside of your cover (this will prevent any condensation that forms from dripping onto the glaze).
To cut, you'll need a large, sharp, heavy, straight-edged knife. If you want to keep your cuts neat, you'll have to run the blade under very hot water, then shake it off, before each cut. Remove the bars, still in foil, from the pan to a cutting board. Gently peel foil back from edges. Trim about 1/4 inch from each edge, then cut into 32 pieces.
32 bars
Variation: Omit the Glaze and Decoration. Thinly slice good strawberries; macerate with sugar to taste (don't make them too sweet!) and maybe a bit of Grand Marnier for about one hour at room temperature, lightly covered (stir occasionally). When the uncut pan has been chilled, cut into 16 to 24 bars. Serve each bar on a plate with some of the berries and their juices over the top.
(c) Stephanie Zonis provides the above information to anyone, but retains copyright on all text. This means that you may not: distribute the text to others without the express written permission of Stephanie Zonis; "mirror" or include this information on your own server or documents without my permission; modify or re-use the text on this system. You MAY: print copies of the information for your own personal use; store the files on your own computer for your personal use only; reference hypertext documents on this server from your own documents.
Chocolate Find:
Chocolate Deities
 You need a present. It might be Valentine’s Day gift; or a congratulatory something for your very best friend’s well-deserved promotion; or a token of appreciation for your dog-walker, who took your dog out twice a day, every day, this past year. But you want it to be something special, something a little different, something with a bit of soul to it. How about chocolate with a spiritual bent? Is that really possible? Chocolate Deities has no doubt that it is, and after sampling some of their creations, I concur. Choose from an Immortal, a Mortal, a Power Animal, a Trickster, or a Symbol; all are molded in chocolate. You’ll have a choice of chocolate type in most cases, so a milk chocolate Kokopelli, a white chocolate Ganesh, or a dark chocolate Vision Serpent are all just a click away.
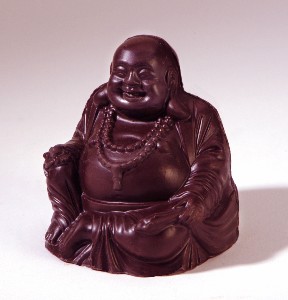
The chocolate used is of excellent quality, and I love the clever Chocolate Deities website, which shows off their creations in different chocolates and tells the legend of each. The gift wrap is elegant and not flashy. But something else that sets this small company apart from others (as if anyone else offered Chocolate Immortals in the first place!) is the painting and gilding (all done by hand) you can choose. Painting or gilding isn’t a possibility for every piece, but it is for many, and either is truly spectacular. I haven’t been able to bring myself to consume the painted Meditating Buddha I ordered some weeks ago; it’s too beautiful and I just want to show it to everyone! Unquestionably, the single most spectacular piece on the site is the gilded Mayan Calendar---amazing! Of course, all painting and gilding is completely edible.
Promise me that if you order anything from Chocolate Deities, you’ll order it early. There’s no mass production here, just a small crew working with dedication. Head over to the website, www.chocolatedeities.com, surf through, and see if you don’t agree that spirituality and chocolate are perfect together.
![]()
Stephanie (HandOverTheChocolate@comcast.net) has had a strong affinity for chocolate from a very early age. Family members claim that, as a child, she was able to hear chocolate being opened in the kitchen no matter where she was in the house. Stephanie was baking by the time she was 6 and ran a short-lived baking business out of her parents’ kitchen when she was in high school. She has a Master’s Degree in Foods from Virginia Tech but no formal training in cooking or baking. Consequently, she is a home cook, not a chef. Prior to beginning this column, she had written about chocolate for some 8 years.
Note: This information was accurate when it was published. Please be sure to confirm all rates and details directly with the businesses in question before making your plans.


