Special Feature: Products Sally Recommends
Who Makes the Best Chocolate?
I’ve written professionally about chocolate since 1997, and I’ve been playing with it for a lot longer. I’ve tasted more brands and types than I can count. I’ve had people ask me everything about chocolate, from whether it’s really an aphrodisiac to how long it takes a person to “walk off” the calories in a single chocolate chip. But the question I still get asked the most is the one I like the least: who makes the best chocolate?
There are a couple of reasons for my aversion to this question. Right off the bat, the question is too broad in scope. Exactly what form of chocolate are we talking about here? Bar chocolate? Chocolate chips? Hot chocolate? Truffles? Brownies? Ice cream? So many foods are chocolate-based (or have that glorious potential) that a little specificity is required. Even if you can narrow the range of your inquiry to, say, bar chocolate, you still have to come up with more answers. Are we including white chocolate here, which, as most of you know, isn’t technically chocolate at all? Are you thinking of, for instance, solely dark chocolate bars? What about chocolate bars with fillings? Again, the possibilities are too great for me to have a ready answer. But there’s a more important reason that I don’t, or rather, shouldn’t, have such a reply waiting.
That reason? I shouldn’t be making up your mind for you. Jim Graham, of the late, great Chocolats Le Francais in Wheeling, Illinois, told me once that Americans grow up distrusting their sense of taste in a way that Europeans do not. I don’t know that much about European customs, but it is true that Americans seem quite content to let celebrities and critics tell them what and where to eat and drink. I’m at a complete loss to understand this phenomenon. Several years ago, I was speaking to a representative of a chocolate company located across the country. This man was trying to tell me all about the good qualities of his chocolate, but in my case he went about it the wrong way; he began spouting a list of celebrities who had purchased his products, ending up with a claim that a very popular actress had ordered his chocolates for all of her holiday baskets that year. Well, so what? I’m always pleased when people find chocolates they enjoy, whether those people are among the “rich and famous” or not. But telling me that someone famous can’t live without your chocolate isn’t something I care about. In fact, it shouldn’t be something anybody cares about, because none of these people are you. None of them possess your unique sense of taste, so they can’t possibly know which brand of chocolate you’ll like best. Why would you cede control of your tastebuds to anyone else? Yet it happens constantly in American society. So many of us depend on the opinions of famous talk show hosts or actors or food show personalities (or food writers!) to determine how we spend our money.
It isn’t entirely bad that celebrities discuss particular foods they like, as they might bring to your attention a product or company of whose existence you’d been unaware. But please don’t automatically adopt their opinions, no matter how much you admire the people! Remember that many times they are paid for their endorsements. (By contrast, I am not paid to tell you about the chocolates you see recommended in this column; you read about them only if I like them and think they’re worth your checking out. If a company offers to send me chocolates for free, I will sometimes accept that offer, but only on the strict understanding that they will receive my honest opinions. If I don’t like their chocolate, you don’t read about it here! I pay retail for most of the chocolates I try, however, just as you do).
You may ask how you are ever going to try all the chocolates out there. You can’t; there are too many of them these days. What you can do, staying within sensible budgetary and dietary constraints, is try those chocolates you can reasonably get to. Some of you will want to “specialize” in certain categories, such as hot fudge sauces or milk chocolate bars; many others prefer the more general “as long as it’s chocolate” approach. That’s up to you, too. The point is that you continue to try chocolate products that are new to you. Pay some attention to what you eat. In this way, you’ll become aware of what appeals most to your tastes, and that’s the only thing truly important here.
In sum, the answer to the question I like least is the one you least want to hear: the “best” chocolate for you depends entirely on what you like. So dust off those tastebuds and sally forth into the multi-faceted world of our favorite “indulgence” food!
![]()
Chocolate Recipes:
Brutti ma Buoni al Cacao
 “Brutti ma buoni” translates to “ugly but good”. I don’t know how these cookies got saddled with such a name, as I don’t find them unattractive in the least. They are meringues (in this case, chocolate meringues) with chunks of bittersweet chocolate and toasted hazelnuts in them; there are as many recipes for these as there are people who bake them.
To ensure good volume of your egg whites when they’re beaten, make sure they’re at room temperature (or slightly warmer). Your bowl and beaters must be completely grease-free, too. The meringue for these cookies is very stiff, but that makes it easier to portion out. Perfect with coffee or tea or for any informal gathering. Brutti ma Buoni will keep at room temperature for a few days if stored airtight. They can be frozen for longer storage, but they are fragile (see directions below) and I think their flavor begins to diminish if they’re frozen for more than a few weeks.
3/4 cup skinned hazelnuts
2/3 cup (about 4 ounces) bittersweet OR semisweet chocolate chunks, no larger than about
1/4 inch on a side
4 egg whites, from eggs graded “large”, at room temperature
1 tsp. cream of tartar
Large pinch of salt
1/2 cup granulated sugar
2-1/4 cups unsifted confectioners’ sugar
1 tsp. vanilla
1/3 cup unsweetened Dutch process cocoa powder
Adjust rack to center of oven; preheat oven to 350 degrees F. Place hazelnuts in single layer in shallow, foil-lined baking pan. Toast hazelnuts about 9 to 12 minutes, stirring often, until very fragrant and a light golden brown. Remove from oven. Cool completely before chopping coarsely (this can be done up to 24 hours in advance). In small bowl, combine completely cooled, chopped hazelnuts and chocolate chunks; set aside.
If necessary, heat oven again to 350 degrees F. Line large baking sheets with parchment paper cut to fit. In large bowl of electric mixer fitted with whisk beater, beat egg whites and cream of tartar at medium speed until foamy. Add salt. Gradually increase speed to high and beat until white and greatly increased in volume. Gradually add granulated sugar, reducing mixer speed as you add it, then increasing mixer speed again until the sugar is thoroughly blended in before the next addition.
Repeat procedure with confectioners’ sugar, reducing speed as each addition is put into the meringue, then gradually increasing speed again to blend it in. About halfway through adding confectioners’ sugar, stop the mixer; scrape down bowl and beater with a large spatula before beginning to add remaining sugar. Meringue will be very stiff when all sugar has been added, and it should hold a stiff peak. Add vanilla and beat in thoroughly. Remove bowl from mixer, scraping as much meringue from beater into bowl as possible.
SIFT IN the Dutch process cocoa powder, then carefully fold it in with a large spatula. The meringue will be so stiff that it will take you a couple of minutes to thoroughly blend in the cocoa powder—OK. Once the cocoa powder is thoroughly blended in, and the chocolate chunks and cooled, chopped hazelnuts; fold in just until evenly distributed.
Drop the meringue by heaping teaspoons onto the parchment-lined baking sheets. Make sure to leave some room between the meringues, which will spread as they bake; I use 17 by 12 inch baking sheets here, and place 15 meringues onto each. Bake one sheet at a time in the preheated oven for 11 to 13 minutes, turning back-to-front once about halfway through baking time. The meringues will expand and crack as they bake. The lesser baking time will result in a chewier center, while more baking time will mean a drier and airier meringue throughout. While one panful bakes, continue dropping more meringues onto other prepared cookie sheets; they can stand at room temperature, uncovered, until there is space in the oven for them.
When meringues are done, remove baking sheet to cooling rack. Allow meringues to stand for 1 to 2 minutes, then slide parchment paper, with meringues still on it, to another cooling rack. Allow meringues to stand till completely cooled, then peel from parchment paper (they should peel off very easily).
Store meringues airtight at room temperature for up to three or four days; freeze for longer storage. To freeze, place meringues in single layer on parchment or wax paper lined baking sheet; freeze until frozen through. Stack carefully in freezerproof container; place in freezer where they won’t get crushed. Thaw at room temperature, still in container.
About 3 dozen meringues
© Stephanie Zonis provides the above information to anyone, but retains copyright on all text. This means that you may not: distribute the text to others without the express written permission of Stephanie Zonis; “mirror” or include this information on your own server or documents without my permission; modify or re-use the text on this system. You MAY: print copies of the information for your own personal use; store the files on your own computer for your personal use only; reference hypertext documents on this server from your own documents.
Chocolate-Glazed Pumpkin Cake
I’ve never been a fan of pumpkin pie, so I’m always looking for alternative ways of using pumpkin. Here’s a spiced, nut-and-chocolate filled, moist, dense cake that looks beautiful in its chocolate glaze. This will keep nicely at room temperature for a day or two, or in the refrigerator for a few days, if tightly covered; you can also freeze it.
You’ll need solid-pack pumpkin to make this; do not use canned pumpkin pie filling. You can substitute pecans for the walnuts if you wish. Make it with a stand mixer; a hand-held mixer might become bogged down by the heavy batter. A small piece goes a long way; this cake is heavy and substantial. I always make this a day or so before serving, as I like to give the flavors a chance to blend.
2-1/2 cups sifted all-purpose flour
1-3/4 tsp. baking soda
1 tsp. baking powder
1 tsp. cinnamon
1/2 tsp. ground ginger
1/2 tsp. nutmeg, preferably freshly grated
1/8 tsp. ground cloves
1 cup medium-fine-chopped walnuts OR pecans (see Note)
1 cup miniature semisweet chocolate chips
3/4 cup unsalted butter, softened
1-1/3 cups firmly packed light brown sugar
1/2 cup granulated sugar
1 tsp. vanilla
4 eggs, graded “large”
3/4 cup water
About 1-3/4 cups solid-pack pumpkin (contents of one 15 ounce can)
Glaze:
8 ounces good-quality semisweet chocolate, finely chopped
1/4 cup (1/2 stick) unsalted butter, cut into thin pats
2 Tbsp. hot water
1 Tbsp. light corn syrup
Few grains salt
Adjust rack to center of oven; preheat oven to 350 degrees F. With solid vegetable shortening, grease a 9 by 3-1/2 inch tube pan. Line the bottom with a circle of wax paper cut to fit, then grease the paper. Lightly flour pan, knocking out any excess.
Into medium bowl, sift together flour, baking soda, cinnamon, baking powder, ginger, nutmeg, and cloves. With spoon, stir well to combine. In small bowl, combine nuts and chocolate chips. Place a spoonful of the sifted dry ingredients onto the chips and nuts, then stir thoroughly until both are coated with flour mixture.
In large bowl of electric mixer, combine softened butter, sugars, and vanilla. Beat at medium speed until fluffy and well-combined (a minute or two). (Throughout mixing process, scrape bowl and beater(s) frequently with rubber spatula to ensure a complete blending of ingredients.) At a low speed, add eggs, one at a time; when all eggs have been added, increase speed to medium and beat until well-mixed. Batter may look curdled--OK.
At lowest speed, add about 1/3 of sifted dry ingredients, then gradually add water, mixing after each addition only until smooth. Add about half of remaining dry ingredients at lowest speed, than gradually add all of pumpkin, again beating only until combined. Add remaining dry ingredients, increasing mixer speed slightly if required to combine. Remove from mixer.
Add chip-nut mixture, along with any dry ingredients remaining in bowl. With large rubber spatula, stir and fold in just until evenly distributed. Turn into prepared pan. Level batter, then form a trench by pushing batter higher on sides and tube of pan. Batter will fill pan about 3/4 full
--OK.
Bake in preheated oven 55 to 70 minutes. During baking, cake will rise slightly above pan (at least in the center) and cracks will form in the top. If top of cake is becoming too brown during baking, cover loosely with aluminum foil. Switch pan back-to-front once about halfway during baking. Cake is done when toothpick inserted in highest part emerges with a few moist crumbs still clinging to it. Do not overbake. Remove to cooling rack.
Allow to stand 15 to 20 minutes. Gently loosen cake from sides and tube of pan, then invert onto cake rack; re-invert to cool right side up. Cake sides will be a very dark brown--OK. Cool completely before glazing.
For Glaze: In medium heatproof bowl, combine all ingredients. Place over simmering water on low heat (water should not touch bottom of bowl); stir until melted and smooth. Remove from heat and hot water. Allow to stand until cooled to room temperature (test a little on the inside of your wrist)--glaze will thicken slightly while cooling. While glaze cools, place cake on serving plate at least 10 inches in diameter. Cut 6 to 8 strips of wax paper, and gently place them under the outer edges of the cake.
When glaze has cooled, slowly pour it over top of cake; quickly spread evenly, preferably with an offset spatula. You want most of the glaze to stay on the cake top, so don’t spread too much onto the sides. Before glaze sets, pull wax paper strips out from bottom.
I prefer to store the glazed cake in the refrigerator, but if you’re only going to have the cake around for a day or two, it can be stored at cool room temperature. If stored at room temperature, do not let wrappings touch top of glaze, or glaze will “weep”. To serve, cut slices with a sharp, serrated knife; if you have stored the cake in the refrigerator, allow the slices to stand at room temperature, loosely covered, for 20 to 30 minutes before serving.
Note: If you’d like a slightly more decorated appearance, include only 1/2 cup of chopped nuts in the cake. Finely chop the remaining 1/2 cup. After cake is glazed, before glaze sets, sprinkle top of cake with the finely chopped nuts.
At least 12 servings
© Stephanie Zonis provides the above information to anyone, but retains copyright on all text. This means that you may not: distribute the text to others without the express written permission of Stephanie Zonis: “mirror” or include this information on your own server or documents without my permission; modify or re-use the text on this system. You MAY: print copies of the information for your own personal use; store the files on your own computer for your personal use only; reference hypertext documents on this server from your own documents.
![]()
Chocolate Find:
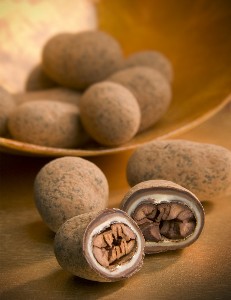
Cocoa Puro
Time for a riddle! What’s chocolate and is crunchy and smooth and bitter and sweet simultaneously? Give up? It’s the Kakawa Cocoa Beans from Cocoa Puro, a chocolate product unlike any I’ve ever tried. Whole cocoa beans are roasted, then coated in white, milk, and dark chocolates and dusted in cocoa powder (no, I don’t know how that’s done---just another sweet mystery of Life!) . Each chocolate is about the size of a large almond, but, if you’re judging by flavor, great things can indeed come in small packages. Aside from their unique character, Kakawa Cocoa Beans are praiseworthy because of the high quality of ingredients used to make them . Bite into one; there’s an initial crunch, along with the deep flavor of cocoa beans. Then, both texture and taste broaden at the same time, as though you’re eating multiple chocolates instead of just one. Great fun!
Cocoa Puro is a fledgling venture. If you live near Austin, TX, you might be able to find Kakawa Cocoa Beans locally (especially at the Downtown Farmers’ Market on Fourth and Guadalupe, where you’ll meet the indefatigable head chocolatier himself). Kakawa Cocoa Beans are available in 2 ounce and 12 ounce red foil bags (very decorative for the holidays) as well as 5 ounce brown bags. The website describes these chocolates as “pure bliss”; try some and see if you agree. Surf over to www.cocoapuro.com (Google hasn’t picked it up yet, but it’s there) and e-mail the head chocolatier for more information. Online ordering is in the works but may not be set up quite yet.
![]()
Stephanie (HandOverTheChocolate@comcast.net) has had a strong affinity for chocolate from a very early age. Family members claim that, as a child, she was able to hear chocolate being opened in the kitchen no matter where she was in the house. Stephanie was baking by the time she was 6 and ran a short-lived baking business out of her parents’ kitchen when she was in high school. She has a Master’s Degree in Foods from Virginia Tech but no formal training in cooking or baking. Consequently, she is a home cook, not a chef. Prior to beginning this column, she had written about chocolate for some 8 years.
Note: This information was accurate when it was published. Please be sure to confirm all rates and details directly with the businesses in question before making your plans.


